Is your hair straightener brush starting to look a little grimy, dull, or just not working the way it used to? Don’t panic—this is a common problem, and there’s an easy fix.
Hair straightening brushes are absolute lifesavers for cutting down styling time and delivering smooth, sleek results. But like all heated styling tools, they collect residue from your hair and products over time. This gunk doesn’t just make your tool look messy—it can also impact its performance and even damage your hair.
Whether you’ve invested in a high-end ceramic straightening brush or a budget-friendly model, regular cleaning is essential to keep it working like new.
In this comprehensive guide, you’ll learn:
- Why your brush gets dirty in the first place
- How to clean your hair straightener brush safely
- What products and tools you’ll need
- Mistakes to avoid while cleaning
- Expert tips for preventing build-up in the future
Let’s dive in—and get that brush looking (and working) brand-new again.
💡 Why Should You Clean Your Hair Straightener Brush?
Before we get into the how, let’s talk about the why. If you’re not cleaning your hot styling tools regularly, here’s what might be happening behind the scenes:
1. Build-Up Reduces Performance
Each time you use your brush, it collects hair product residue (like mousse, heat protectant, hairspray), natural scalp oils, dust, and dead skin cells. Over time, this build-up can coat the bristles and ceramic plates, reducing heat conductivity and efficiency. The result? Longer styling times and uneven straightening.
2. It Could Be Damaging Your Hair
A dirty brush doesn’t just perform poorly—it can also damage your hair. The grime bakes onto the heated plates and gets transferred back to your hair during use. This leads to frizz, breakage, and dullness.
3. It’s a Breeding Ground for Bacteria
Gross but true: scientific studies have found that dirty hair tools can harbor thousands of bacteria per square inch. This bacteria can be spread to your clean hair and scalp—contributing to itchiness, scalp irritation, or even breakouts.
4. You’ll Extend the Lifespan of Your Tool
Cleaning your straightener brush regularly helps protect your investment, ensuring your brush stays effective and safe for years to come.
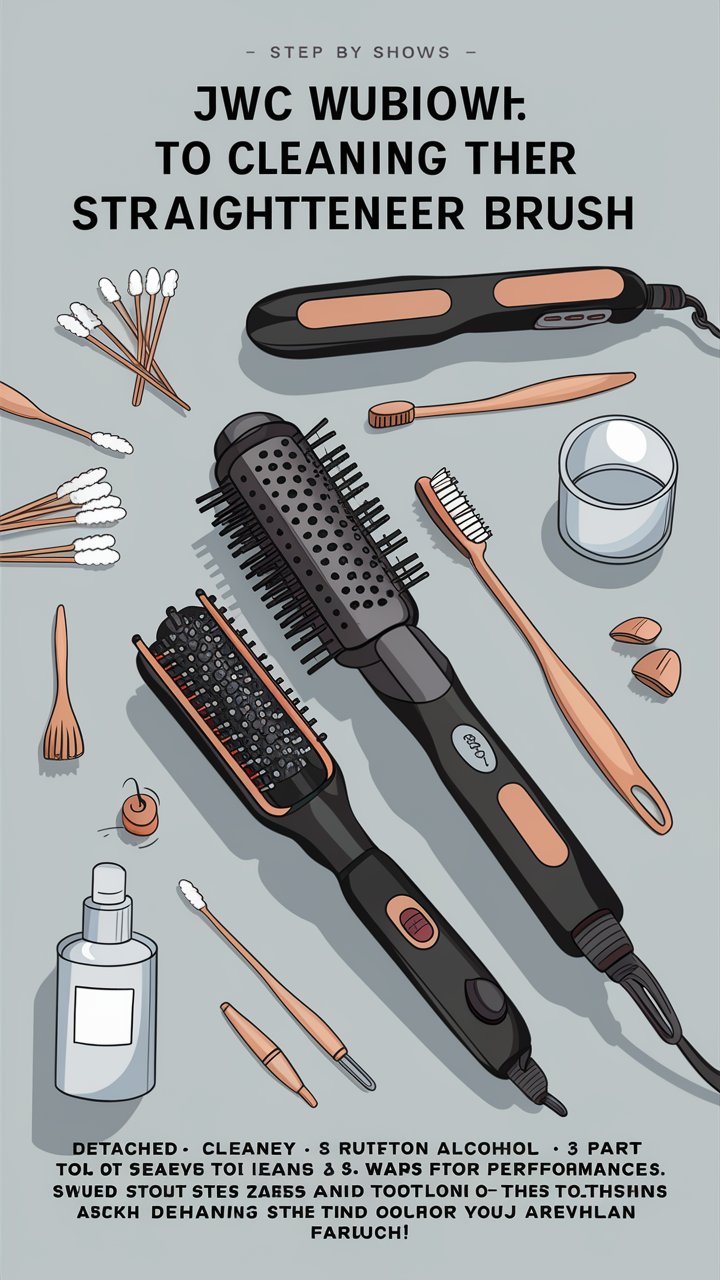
🧽 What You’ll Need to Clean Your Hair Straightener Brush
You don’t need expensive cleaners or fancy tools—just a few basic household items and a little bit of patience.
✅ Supplies Checklist:
- A soft microfiber cloth or paper towels
- A clean toothbrush or small soft-bristled brush
- Cotton swabs or Q-tips
- Warm water
- Mild dish soap (optional)
- Rubbing alcohol or white vinegar (optional for deep cleaning)
- A small bowl or cup
- Lemon juice (optional for natural cleaning)
🔥 Step-by-Step: How to Clean Your Hair Straightener Brush
Now that you’re armed with the right tools, let’s go through the complete cleaning routine in clear, simple steps.
Step 1: Unplug the Brush
Safety first! Always unplug your brush and allow it to cool completely before starting the cleaning process.
🔥 Optional Pro Tip: Some people prefer to warm the brush slightly (for a minute or two on low heat), then unplug it and let it cool until it’s just warm to the touch. This softens hardened product build-up and makes it easier to remove. Just be cautious!
Step 2: Remove Loose Hair
Using your fingers or a dry toothbrush, gently remove any strands of hair that are tangled in the bristles. This step alone can drastically improve brush performance.
💡 Tip: Turn the brush upside down and tap it gently to release loose dirt or hair.
Step 3: Wipe Down the Surface
Dampen your microfiber cloth or paper towel slightly with warm water. Gently wipe the bristles, ceramic plates, and body of the brush. Avoid dripping water near any electrical parts or buttons.
💡 Avoid: Never submerge your brush in water—it’s an electrical device!
Step 4: Use a Toothbrush for Tough Spots
For grime or product that’s stubborn, dip a soft toothbrush into warm, soapy water and gently scrub the base of the bristles and the ceramic plates. This will help lift hardened build-up.
🔍 Focus: Pay special attention to the edges of the heating plates and the roots of the bristles, where gunk often hides.
Step 5: Deep Clean with Vinegar or Alcohol (Optional)
If your brush is particularly dirty, try this natural disinfecting method:
- Mix 1 part white vinegar or rubbing alcohol with 1 part warm water.
- Dip a cotton swab in the solution and clean between the bristles and around the ceramic plates.
This removes bacteria and sanitizes the surface without using harsh chemicals.
Step 6: Dry Thoroughly
Once your brush is clean, wipe it with a dry cloth and allow it to air-dry completely before plugging it back in.
⚠️ Mistakes to Avoid When Cleaning Your Straightener Brush
Cleaning is easy—but only when done correctly. Here are some common mistakes people make (and how to avoid them):
| Mistake | Why It’s a Problem | What to Do Instead |
|---|---|---|
| Submerging the brush in water | Can cause electrical damage | Use a damp cloth only |
| Using sharp tools (like tweezers or knives) | May scratch or break the ceramic surface | Use soft brushes or cotton swabs |
| Cleaning while the brush is hot | Risk of burns or product smearing | Wait until it’s cool or warm-touch only |
| Using harsh cleaners or bleach | Can strip the coating or damage electronics | Stick to gentle soap or natural cleaners |
🛡️ How to Prevent Build-Up on Your Hair Straightener Brush
Prevention is easier than cure. These simple habits will reduce grime and keep your tool working beautifully:
✅ Only Use on Clean Hair
Never use your straightener brush on oily, sweaty, or product-heavy hair. It just transfers the mess onto your brush.
✅ Wipe After Each Use
While the brush is still warm (not hot!), use a dry or lightly damp cloth to wipe off any surface residue before it hardens.
✅ Deep Clean Every 2 Weeks
If you use your straightening brush regularly, aim to deep clean it every two weeks.
✅ Store It Properly
Keep your brush in a clean, dry place. Use a protective case or dust bag to avoid grime, moisture, or tangles.
🔄 How Often Should You Clean Your Hair Straightener Brush?
How frequently you clean depends on how often you use it:
| Usage | Cleaning Frequency |
|---|---|
| Daily | Wipe after each use, deep clean weekly |
| A few times per week | Wipe after use, deep clean bi-weekly |
| Rarely | Clean before and after every use |
🌿 Natural Cleaning Solutions for Eco-Friendly Users
Want a chemical-free way to clean your styling tools? Here are a few natural solutions:
- Lemon Juice + Water: Natural degreaser and fresh scent
- Baking Soda Paste: Great for scrubbing tough grime
- Apple Cider Vinegar + Cotton Ball: Disinfects and shines
- Aloe Vera Gel: Soothes surfaces and removes mild dirt (great if your brush has silicone parts)
🧼 Quick Cleaning Checklist
Here’s a summary you can save or screenshot:
✔ Unplug and let brush cool
✔ Remove hair from bristles
✔ Wipe with damp cloth
✔ Scrub with toothbrush and mild soap
✔ Use vinegar/alcohol for deep clean
✔ Dry completely before using
✨ Final Thoughts: Keep It Clean, Keep It Sleek
Cleaning your hair straightener brush isn’t just a beauty routine—it’s essential maintenance. By removing product build-up, preventing bacterial growth, and ensuring the tool performs at its best, you’re protecting both your hair and your investment.
Think of it like skincare for your styling tools: the cleaner it is, the better the results.
So set a reminder, add it to your Sunday self-care routine, or pair it with your monthly beauty drawer clean-out. Your hair—and your brush—will thank you.